Pages

Tuesday, 15 November 2016

DIY Nut Mylk


Nut Mylks are much better for the body than dairy or soy mylk. Homemade nut mylk is also much better for the body than store bought almond, rice or other type of nondairy mylk because those mylks contain unhealthy additives and wayyyy too much sugar.


24 ounces coconut mylk

2 cups almonds, cashews or 1 coconut – white meat extracted.
1 mason jar or glass bottle
blender
1 nut mylk bag or cheese cloth or you can use a clean bandana

Method:

For 12 hours, soak almonds/cashews in water, in a mason jar or bowl filled to the brim.

Throw off water and place almonds/cashews into a blender. Pop off the skin of almonds first.

Or extract coconut white meat and place in blender. To extract coconut meat easy, crack shell and allow to bake in oven for no more than 3-5 minutes or place in hot sun if you have the time. Use a knife to push out meat. Cut into small pieces.

If you have a big blender jar combine 4 cups of water and the nuts in the blender and blend well.

If using a Nutribullet blend in two parts: 2 cups of water with half the nuts or coconut meat at a time.

Pour some mixture into nut mylk bag and squeeze out mylk into a bowl, repeat this til blender is empty.

Strain the nut mylk a second time to remove any remaining nut pulp.

You can sweeten the mylk with powdered nutmeg, cinnamon, coconut sugar, or agave.

Store in a mason or other glass jar and consume within a few days.

Add to smoothies or to make cereal, to soak oats, or add to all your quinoa and lentils when cooking or to any vegan dishes that require milk. You can also just drink it with a dash of turmeric every morning as an overall body boost and parasite killer.


Make your own nut mylk bag with a light white cotton fabric, cut two pieces into a square, sew up three sides and voila!

Happy Mylking!

Ila

DIY Sprouting - Make your own sprouts tutorial


Sprouts are super healthy and rich in dietary fibre and protein! They are the healthiest form of greens to consume also because they do not need any fertilizer or pesticides to keep bugs away. They are totally organic and Ital.

Sprouts are essential to every raw-vegan or Ital livity to provide a wide variety of vitamins and minerals such as: vitamins C, A, and K, manganese, riboflavin, copper, protein, thiamin, niacin, vitamin B6, pantothenic acid, iron, magnesium, phosphorus, and potassium.

Sprouts can be bought at the grocery but it is better to make your own at home because they have a short shelf-life and easily contract bacteria because they are moist. Using these super simple steps below you can make your own sprouts with any type of seeds/peas or beans.


You will need:

1/4 cup Green mung beans,  sunflower seeds or Lentils
1 large mason jar
1 square of white light cotton fabric
1 rubber band or elastic band


Method:

Day 1
1. Measure out the mung beans or lentils and wash them thoroughly.

2. Place them in the mason jar and fill with clean water. You can use a glass bowl if you wish.

3. Allow the jar to sit overnight as the seeds swell and germinate. 12 hours soaking time.

So start Day 1 at 7 pm and then at 7 am move on to next step, for example.
Or you can also start at 7 am and then move onto next step at 7 pm.


Day 2
4. In the morning, pour off the water using a strainer and rinse the beans/lentils. Shake off the excess water.

Place them back in the jar and using the small strainer, turn upside and drain off excess water. Cover with the cotton/cheese cloth fabric and secure with elastic. I take a knife and punch small holes in the fabric as well.

5. Set somewhere, where there is not much sunlight. A dark and cool place. A pantry may work, or on a shelf where the sun does not hit to strong. I just put mine on the kitchen counter away from the window.


6. Twelve hours later at night – again use the 7—7 time, remove the cover, fill with water and rinse the mung/lentil seeds again with strainer. Drain excess water again and place back in jar and cover with cloth. Place back in cool dark area.


Day 3
7. In the morning rinse and drain the seeds again, they should have long tails by now.

At this time I throw my seeds onto a plate and I remove the bad seeds or sprouts and all the outer seed skins that have come loose. That will help keep them fresh and not smell as these loose parts will start to break down.


If you wish to have more leaves then place sprouts back in the jar and cover til twelve hours later again. Set jar in the same spot.


8. Perform the night time rinse and drain, then recover with cloth. Place back in cool dark area.


At this stage you can also choose to store the sprouts for use. They should be just starting to show leaves. See below for storage tips.


Day 4
9. Morning rinse and drain, further remove any bad bits. Cover jar and set back in cool dark spot.

10. Evening rinse and drain, replace covered jar to its location.


Day 5
11. Rinse and pat dry your sprouts, you can choose to eat them on this day or give them one more day of sprouting especially to get the green leaves.

12. Eat or store your sprouts!

To store I dab again with paper towel and use the large mason jar padded with paper towel. You can also use bpa free plastic. I place the lid on and put in the fridge.


It is best to consume within 3 days, so you can start a new batch of seeds as soon as the first is complete. Be sure to remove any condensation that occurs in your container from refrigeration to extend shelf-life of sprouts.

Happy sprouting!
Ila

Wednesday, 9 November 2016

Hummus Recipe


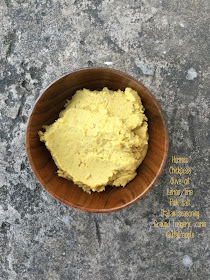
Hummus is the type of recipe that can be altered to your pantry stock or your tastes. I have provided two recipes, one basic, and one seasoned with are both quite delicious!


Basic Hummus Recipe


1.5 cups cooked channa peas (or 1 can)
1-1.5 tbs olive oil
1 lemon or lime, juice extracted (or 1 tbs apple cider vinegar)
1 clove garlic (optional)
1 tsp Sea or pink salt to taste
1/2 tsp ground cumin
½ tsp ground turmeric or a fresh piece
½ tsp Italian seasoning, cayenne, ground ginger and paprika (optional)


Seasoned Hummus 


1.5 cups cooked channa peas (or 1 can)
1-1.5 tbs olive oil
1 lemon or lime, juice extracted
1 tsp Sea or pink salt to taste
1 tsp black pepper
1/2 tsp ground cumin
½ tsp ground turmeric or 1 small fresh piece
½ tsp ground ginger or 1 small fresh piece
½ tsp Italian seasoning, ground paprika  or cayenne
1 clove garlic (optional)
¼ onion
1 tbs nutritional yeast
1.5 tsp kelp or dulse seasoning

Method:


Soak the channa in boiling water twice, and overnight. Cook until tender. Or use 1 can of chickpeas.

Prepare all fresh seasoning such as onion, garlic, ginger or turmeric.

Blend all your ingredients together in a food processor to a smooth cream. Use a spoon in between to ensure it mixes well. Add a little water as needed to soften properly.


Serve as a salad dressing, or use as a veggie dip, garnish a quinoa burger or create a fresh rainbow salad wrap.

Raw Veggie Salad Wraps


Makes 4

4 homemade wraps or cheelas (or store bought wraps)

3 leaves of lettuce
4 leaves bokchoy/pakchoi
(any combination of green leafy vegetables is fine, or only one type)
A bunch of parsley
4-5 tomatoes
1 large cucumber
½ carrot
1 small beet
1 small piece of pumpkin
2 okras
½ zucchini
¼ red onion (optional)
¼ cup canned corn (optional)
2 pimento peppers
½ bell pepper
Slices of avocado
1 batch of hummus and/or babaganoush to make it more “Eastern style”


Choose any selection of toppings and dressings you desire!


Toppings:
Chia seeds
Sunflower seeds
Sesame seeds
Pumpkin seeds
Goji berries
Sweet basil or mint leaves chopped


Dressings:
Agave nectar
Cashew cheese
Avocado dressing
Tahini


Method:

Prepare your hummus and cashew cheeze.
Also prepare your wraps or purchase your favourite kind.

Wash and prepare the vegetables:

Chop the lettuce, bokchoy/pakchoi, parsley and dry off excess water.

Slice the tomatoes in half, remove the seeds and then slice thinly into half circles.

Finely dice onion.

Slice cucumber in circles or half circles, you can remove the seeds since they don’t digest, if desired.

Slice okra in circles.

Cut pimento in half and remove the seeds and slice . Do the same for bell pepper.

Peel and grate the beet, zucchini, pumpkin and carrot.

Neatly arrange every vegetable in a large platter.

Drain the can of corn.


To prepare:

Spread the wrap on a large flat dinner plate. Start with the hummus and spread it to the bottom of the circle. Next to that more towards the middle of the wrap place the cashew cheeze and spread (or put it as a topping over the veggies).

Start to build the vegetables on top of the hummus, starting with two handfuls of the greens and peppers, then follow with about 6 pieces each of the tomatoes and cucumber. Cover with the beet,pumpkin, zucchini and carrot and add the corn along the side of this mound.

Sprinkle on the toppings of nuts and seeds.

Lightly press everything down and pull up the bottom flap of the circle and enclose the mound of veggies. Basically, fold over the wrap onto the veggies and tuck in firmly, bringing in the sides. Then roll again and firmly close it. Avoid wet salad dressings as the will disintegrate the wrap.

Wraps are great Womb Friendly and weight loss meals, I full-joy them weekly. 


Blessed Love!
Ila


Cashew Cheeze Sauce and Spread


I like cashew cheeze (or sauce or dip or spread or paste depending on how you use it) because it is so versatile and such a great substitute for those cheese cravings and munchies. Nut cheeze is not quite guilt free because nuts are allergenic, fattening for some and can carry the risk of mold if they are not fresh (always store in glass jar in fridge and consume within a few days). And although nuts are not free for everyone to use because of allergies, this is a great recipe you simply must try if you can safely.

Use this recipe to create a vegan ranch salad dressing, a cheeze paste for bread or crackers, a dip for veggies, a base for pizza, a mac and cheeze sauce and for vegan eggless mayo in cold slaw or for sour cream in veggie wraps! Yes it is that versatile and it all depends on whether you use it warm for mac n cheeze, room temperature as a raw veggie dip or chilled to make a thicker paste for bread and crackers! It also goes well on veggie burgers and roasted potatoes. it also goes well in chickpeas to make a thick creamy sauce. I take mine out of the fridge for a short defrosting before use.

Now buying cashew nuts (unsalted and plain) is expensive so it may not be a weekly recipe, but certainly a monthly treat. Definitely use within 7 days. Always store in a sealed glass jar - glass jars are awesome for this recipe and all your homemade salad dressings. Apple cider vinegar or lemon juice are great additives to keep the longevity of this cheese.


Basic Cashew Dip/Sauce


This first recipe is a basic cashew cheeze sauce

 1/2 cup raw cashews soaked
1 tbs olive oil
½ tsp pink salt
3 tbsp water
Juice of 1 small lemon/lime or 3 caps apple cider vinegar


Method:

Always soak cashew in lots of water for at least 4 hours, overnight is best.

Place everything in a small blender cup of a Magic Bullet or Nutri-Bullet blender and blend until smooth and creamy. Add a little more water at a time as the nuts might give trouble breaking down.

The less wet your mixture is, the more it can serve as a firm cheese when refrigerated.


Seasoned Cashew Cheese

Make mac and cheeze with this one!


1 cup raw cashew nuts (almonds or pine nuts can also be substituted)
1 clove garlic
½ red onion
1/4 bell pepper
1 pimento
1 scotch bonnet or chilli pepper or ½ tsp cayenne (optional spice)
3 chive or green onion tops (optional)
1 tbs lime/lemon juice or apple Cider Vinegar
1/3 cup nutritional yeast
1/3 cup water
1.5 tsp Pink/sea salt
1 pinch turmeric 

Method:
    
Soak cashews overnight or at least 4 hours.

Prepare fresh seasonings by removing skin and seeds.

Combine all ingredients in the blender and blend up until it is smooth.

You will have to stop and move it around with a spatula or spoon to get it going.

Add extra water slowly if too thick.

You can try refrigerating overnight before use for best flavour. Defrost before adding to noodles for making mac and cheese. I usually add it room temperature to my noodles.

Store in mason jar or clean reused jar.


Fulljoy and try it with everything!

Ila